
Support Team
1 year ago
SupportTeam
#teams
Setting up two factor authentication for the first time on a new Entra joined computer
Setting up two factor authentication for the first time on a new Entra joined computer
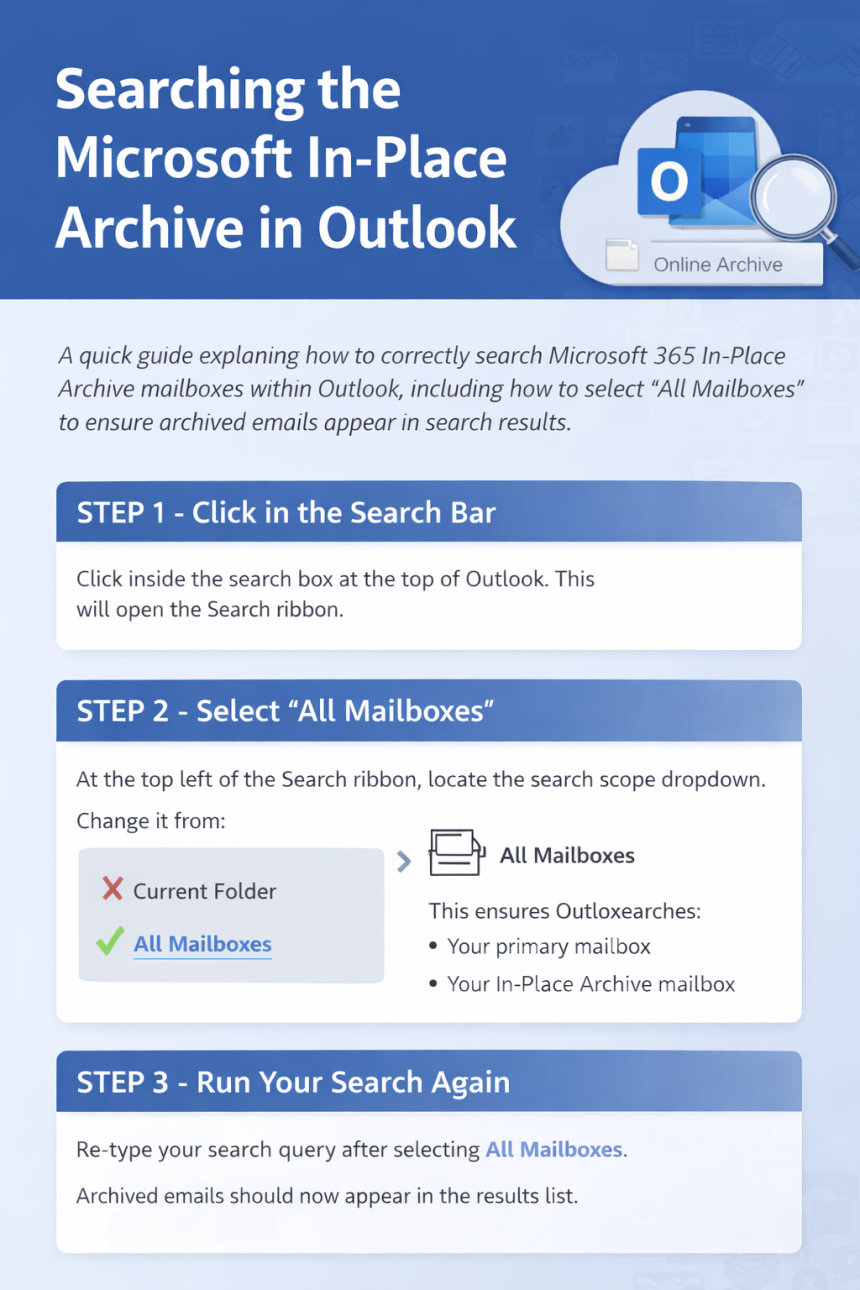
Tutorial: Logging into a New Entra-Joined Device with MFA Using Microsoft Authenticator🧾 Prerequisites:
- A Microsoft Entra ID (formerly Azure AD) user account.
- A new Windows 10/11 device that is Microsoft Entra joined.
- Internet access.
- A smartphone (Android or iOS) with camera access.
Step 1: Download the Microsoft Authenticator App🔸 For Android:
- Open the Google Play Store.
- Search for "Microsoft Authenticator".
- Tap Install.
- Open the app and allow the necessary permissions.
🔗 Microsoft Authenticator on Google Play
🔹 For iPhone:
- Open the Apple App Store.
- Search for "Microsoft Authenticator".
- Tap Get and authenticate with your Apple ID.
- Open the app and allow notifications and camera access.
Help Link:
Step 2: Log Into the Entra-Joined Machine
- Power on the device.
- Enter your Microsoft Entra ID email address (e.g., yourname@yourcompany.com).
- Click Next.
- Enter your password and click Sign in.
🔐 If your organisation enforces MFA, you will be prompted to complete Multi-Factor Authentication setup.
Help Link:
Step 3: Configure the Microsoft Authenticator App
- Choose “Use the Microsoft Authenticator app” as your preferred MFA method.
- On your smartphone:
- Open the Authenticator app.
- Tap the "+" Add account button.
- Select “Work or school account”.
- Tap Scan QR code (allow camera access).
- On your computer screen:
- A QR code will appear.
- Use your phone to scan the QR code.
- Once scanned, the account will be added to the app and you’ll start seeing rotating 6-digit codes.
Help Link:
Step 4: Approve the Sign-in Request
- Your PC will now display:
- “Approve sign-in request via the Microsoft Authenticator app.”
- On your phone:
- Tap Approve when the notification appears.
- Authenticate using Face ID, fingerprint, or phone passcode.
Help Link:
Step 5: Set Up Windows Hello PIN
- Once logged in, Windows will prompt:
- “Set up a PIN for easier and secure login.”
- Click Set up.
- Create a PIN (usually 6 digits; check with your IT if alphanumeric PINs are allowed).
- Confirm and save.
📝 Note: This PIN is unique to this device and is part of Windows Hello for Business.
Help Link:
Future Logins on This Device
- Use the PIN you just created instead of your password.
- MFA will not prompt again on this device unless policy or configuration changes.
Important: New Devices Require Repeating This Process
Each new Entra-joined device will require:
- Entering your email and password.
- Approving the login via Microsoft Authenticator.
- Setting a new Windows Hello PIN, which is local to the specific machine.
Help Link: